Vue
자바스크립트 웹 어플리케이션 프레임워크
프로젝트 생성 및 개발환경 실행
npm install -g @vue/clivue create {프로젝트 이름}cd {프로젝트 이름}npm run serve
컴포넌트 import
<template><MainHeader /></template><script>import MainHeader from './components/layout/MainHeader.vue';export default {name: 'App',components: {MainHeader,},};</script><style>#app {font-family: Avenir, Helvetica, Arial, sans-serif;-webkit-font-smoothing: antialiased;-moz-osx-font-smoothing: grayscale;text-align: center;color: #2c3e50;margin-top: 60px;}</style>
Router 사용
npm install vue-router
main.js
import { createApp } from 'vue';import App from './App.vue';import router from './router';const app = createApp(App);app.use(router);app.mount('#app');
router.js
import { createRouter, createWebHistory } from 'vue-router';import MainHome from './views/MainHome.vue';import MainAbout from './views/MainAbout.vue';import MainCounter from './views/MainCounter.vue';const routes = [{path: '/',component: MainHome,},{path: '/about',component: MainAbout,},{ path: '/count', component: MainCounter },];const router = createRouter({history: createWebHistory(),routes,});export default router;
App.vue
<template><MainHeader /><div id="content" class="content"><router-view></router-view></div></template>
MainHeader.vue
<ul><router-link to="/">Home</router-link><router-link to="/about">About</router-link></ul>
Data Binding
<template lang=""><div><h1>Welcome to {{ title }}!</h1><input type="text" v-model="inputValue" /><button @click="getData">Get</button><button @click="setData">Set</button></div></template><script>export default {data() {return {title: 'HOME',inputValue: 'Hi',};},methods: {getData() {alert(this.inputValue);},setData() {this.inputValue = 'Changed';},},}</script>
Watch
watch: {inputValue() {console.log('watch', this.inputValue);},},
생명주기 메소드
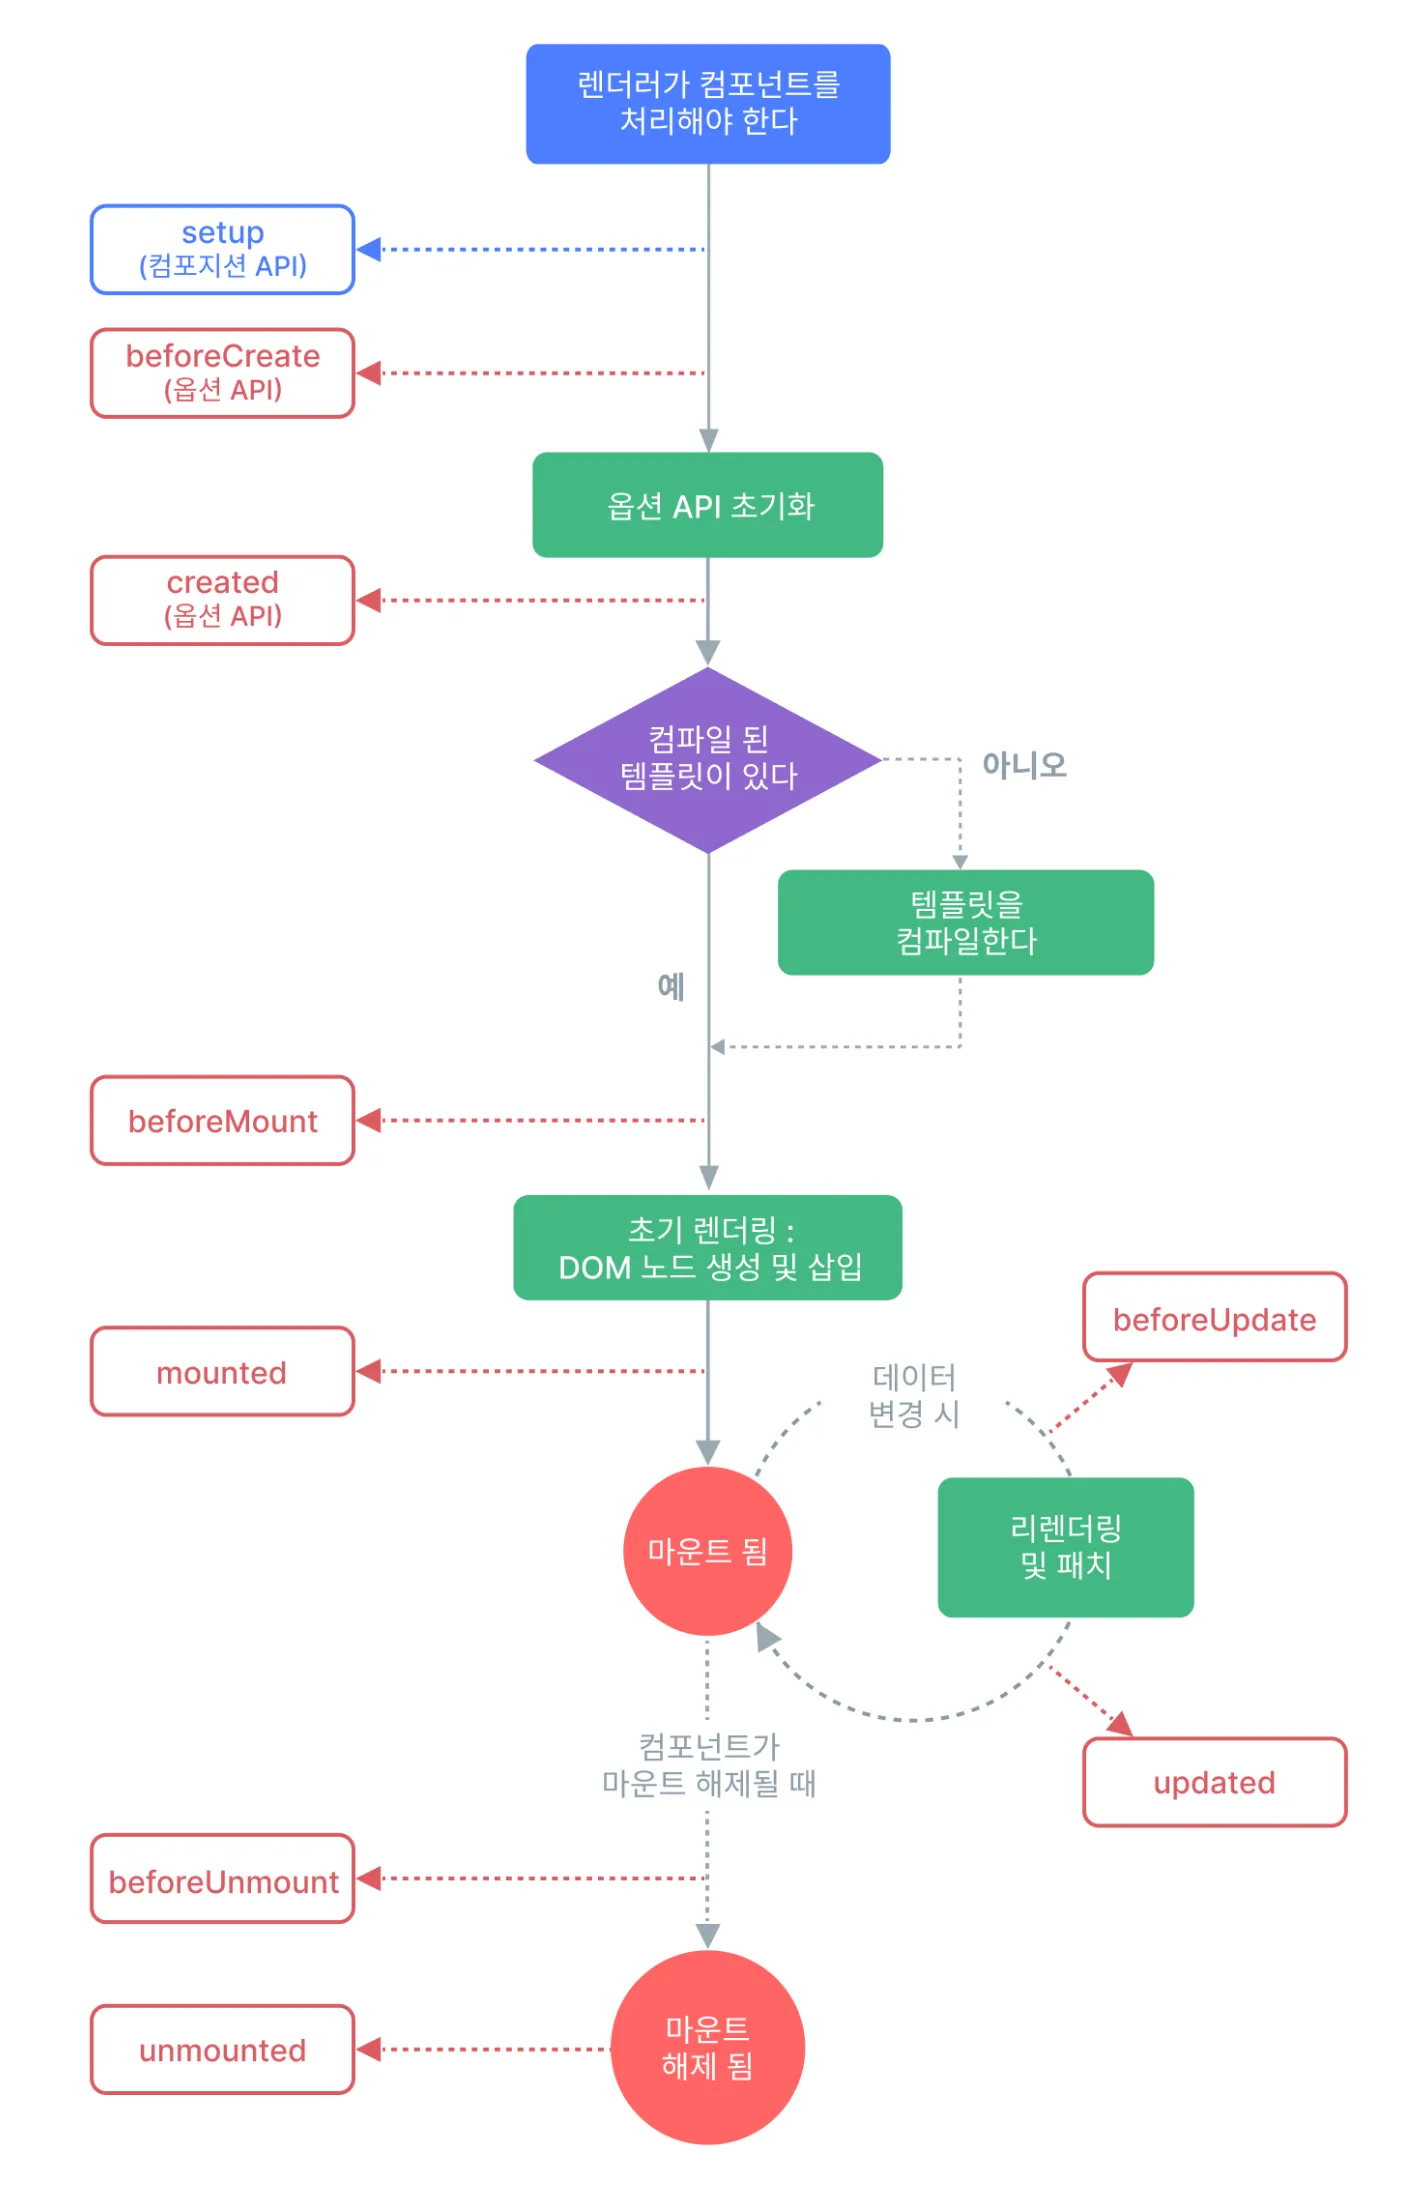
beforeMount() {console.log('beforeMount');},mounted() {console.log('mounted');},beforeUpdate() {console.log('beforeUpdate');},updated() {console.log('updated');console.log('inputValue', this.inputValue);},
v-for (반복 렌더링)
<template lang=""><div><div :key="el" v-for="el in divArr">{{ el }}</div></div></template><script>export default {data() {return {divArr: ['1', '2', '3', '4', '5'],};},}</script>
v-if, v-show (조건부 렌더링)
<div v-if="isDivShowed">Div1</div><div v-show="isDivShowed">Div2</div>
u default {data() {return {isDivShowed: false,}},}
Vuex
Vue의 전역 상태 관리 라이브러리
설치
npm install vuex --save
Store 생성
import Vuex from 'vuex'const store = new Vuex.Store({state: {count: 0},mutations: {increment: state => state.count++,decrement: state => state.count--}})export default store
컴포넌트에서 사용
<template lang=""><div><h1>Counter</h1><div>{{ count }}</div><button @click="up">UP</button><button @click="down">DOWN</button></div></template><script>import store from '../store/index'export default {computed: {count() {return store.state.count}},methods: {up() {store.commit('increment')},down() {store.commit('decrement')}}}</script><style lang=""></style>
payload 전달
import Vuex from 'vuex'const store = new Vuex.Store({state: {count: 0},mutations: {increment: (state, payload) => {state.count += payload.amount},decrement: (state, payload) => {state.count -= payload.amount}}})export default store
<template lang=""><div><h1>Counter</h1><div>{{ count }}</div><button @click="up">UP</button><button @click="down">DOWN</button></div></template><script>import store from '../store/index'export default {computed: {count() {return store.state.count}},methods: {up() {store.commit('increment', { amount: 10 })},down() {store.commit('decrement', { amount: 10 })}}}</script><style lang=""></style>
getters 사용
import Vuex from 'vuex'const store = new Vuex.Store({state: {count: 0,todos: [{ id: 1, text: '1번', done: true },{ id: 2, text: '2번', done: false },{ id: 3, text: '3번', done: true },{ id: 4, text: '4번', done: false },{ id: 5, text: '5번', done: true },{ id: 6, text: '6번', done: false }]},getters: {doneTodo: state => state.todos.filter(el => el.done === true),haveTodo: state => state.todos.filter(el => el.done === false)},mutations: {increment: (state, payload) => {state.count += payload.amount},decrement: (state, payload) => {state.count -= payload.amount}}})export default store
<template lang=""><div><div>DoneTodo</div><div :key="el.id" v-for="el in doneTodo">{{ el.text }}</div><br /><div>HaveTodo</div><div :key="el.id" v-for="el in haveTodo">{{ el.text }}</div></div></template><script>import store from '@/store'export default {computed: {doneTodo() {return store.getters.doneTodo},haveTodo() {return store.getters.haveTodo}}}</script><style lang=""></style>